


JavaScript Scanning Library API Dev Guide
Include scanner.js
For evaluation or lite usage, you can simply include a JavaScript .js file from asprise.com. Alternatively, you may download Scanner.js zip and unzip the files into a folder on your own web server.
Option 1: Include scanner.js from asprise.com
For this option, you simply use a script tag to include scanner.js:
<html lang="en">
<head>
    <script src="//cdn.asprise.com/scannerjs/scanner.js" type="text/javascript"></script>
Alternatively, you can host it on your own server.
Option 2: Host scanner.js on your own server
For this option, you can either use bower to automatically download or manually download scanner.js.
Automatic download with bower
If you use bower to manage components and dependencies, you can simply execute:
bower install scanner.js
After scanner.js has been installed, you can then include it in your pages:
<html lang="en">
<head>
    <script src="bower_components/scanner.js/dist/scanner.js" type="text/javascript"></script>
Alternatively, you can manually download it instead of using bower.
Manual download
Download scanner.js zip and unzip the files into a folder on your own web server.
There isn’t any server side script in scanner.js files so you can unzip it to any web server. Once done, you can include it in your web page:
<html lang="en">
<head>
    <script src="//YOUR_SERVER/PATH_TO/scanner.js" type="text/javascript"></script>
The Scanning Process
In this section, we’ll walk through the typical scanning process.
We’ll use a simple example to illustrate the basic usage of scanner.js. This example will allow the user to scan images and display them on the web page (uploading will be shown in later examples). Below is the screenshot of the web page after two pages are scanned:

Make sure you have already included scanner.js script. To perform a scan, you need to call
the main interface Javascript function scanner.scan, which accepts the following
arguments in order:
- callbackFunction
Function to be called after the scan is done. Required.
- requestSpecification
The scan request in JavaScript or plain string, as defined in Scanner.js Request DSL Reference. Required.
- useAspriseDialog
Whether Asprise scan dialog (allows the user to preview, delete, re-arrange order, and edit acquired images) should be used. Optional. Default to true.
- showScannerUI
Whether native UI (if any) of the scanner device should be shown. Optional. Default to false.
Initiate a scan
To initiate a scan, you can simply
call scanner.scan with proper arguments. For example, the code below initiates a scan that
will output images in jpg format:
function scanToJpg() {
   scanner.scan(displayImagesOnPage,
   {
      "output_settings" :
      [
         {
            "type" : "return-base64",
            "format" : "jpg"
         }
      ]
   }
   );
}
You may use a button to invoke the above function:
<button type="button" onclick="scanToJpg();">Scan</button>

<div id="images"></div>
The div with name images will be used to display images scanned later.
Once the user presses the Scan button, the scan dialog will present and the user can then scan documents. After the scanning is done, the result handler callback function will be invoked.
Handle the scan result using a callback function
Scanner.js will invoke the callback function with the following arguments:
- successful
Boolean flag indicating whether the call is successful or not.
- mesg
Optional message especially when not successful; could be undefined.
- response
The response returned from scanner.js.
Below is the implementation of the result callback function for the example above:
1 2 3 4 5 6 7 8 9 10 11 12 13 14 15 16 17 18 19 20 21 22 23 24 25 26 27 28 29 30 31 32 33 34 | /** Processes the scan result */
function displayImagesOnPage(successful, mesg, response) {
if(!successful) { // On error
console.error('Failed: ' + mesg);
return;
}
if(successful && mesg != null && mesg.toLowerCase().indexOf('user cancel') >= 0) { // User canceled.
console.info('User canceled');
return;
}
var scannedImages = scanner.getScannedImages(response, true, false); // returns an array of ScannedImage
for(var i = 0; (scannedImages instanceof Array) && i < scannedImages.length; i++) {
var scannedImage = scannedImages[i];
processScannedImage(scannedImage);
}
}
/** Images scanned so far. */
var imagesScanned = [];
/** Processes a ScannedImage */
function processScannedImage(scannedImage) {
imagesScanned.push(scannedImage);
var elementImg = createDomElementFromModel( {
'name': 'img',
'attributes': {
'class': 'scanned',
'src': scannedImage.src
}
});
document.getElementById('images').appendChild(elementImg);
}
|
First, we check whether the scan is successful or not. If successful, we check whether the user cancels - in which case no image will be returned.
In a single scan session, you may specify to return both originals and thumbnails (see Scanner.js Request DSL Reference for details).
The scanner.getScannedImages function can be used to extract either or both types of the images from the response:
function getScannedImages(response, includeOriginals, includeThumbnails)
scanner.getScannedImages returns an array of ScannedImage, which is declared as below:
var ScannedImage = function (mimeType, srcIsBase64, src, imageInfo) { // constructor
   // Object fields
   this.mimeType = mimeType;       // Mime type, e.g., 'image/jpeg'
   this.srcIsBase64 = srcIsBase64; // true if src is in base64 data uri false if normal url
   this.src = src;                 // src, can be either base64 data uri or normal url
   this.imageInfo = imageInfo;     // object storing image properties
};

// Object methods
ScannedImage.prototype.getWidth(); // image width or undefined if not available
ScannedImage.prototype.getHeight(); // image height or undefined

ScannedImage.prototype.isColor(); // Whether it is a color image
ScannedImage.prototype.isGray(); // Whether it is a gray image
ScannedImage.prototype.isBlackWhite(); // Whether it is a black/white image

ScannedImage.prototype.getResolution(); // The horizontal scan resolution if available
ScannedImage.prototype.getBitsPerPixel(); // Bits per pixel of undefined

ScannedImage.prototype.getBase64NoPrefix(); // Base64 encoding of the image data

ScannedImage.prototype.toString(); // Readable string describing the image
Once an array of ScannedImage is obtained, we can iterate each ScannedImage (Lines 13-17) and create an img element from it
and then display images on the web page using function processScannedImage. Note that we use imagesScanned to track all ScannedImages
so that we may manipulate later (e.g., upload to server).
scanner.createDomElementFromModel is function defined in scanner.js to help create DOM elements from declarations.
Again, the complete source code is available on GitHub.
Now, the scanned images are shown on the web page. Next, we’ll explore how to scan and upload to the server side.
Scan then Upload in Browsers
There are two options to implement scan then upload in browsers. You can scan and and later upload the scanned images with an existing <form> when submitted.
Alternatively, you can instruct scanner.js to scan and upload directly to the server side.
Option 1: Scan and Upload with a Form
We can simply extend the previous example by adding a HTML <form> element and an optional
<div> to display server response as well as a JavaScript function to submit the form:
<form id="form1" action="https://asprise.com/scan/applet/upload.php?action=dump" method="POST" enctype="multipart/form-data" target="_blank" >
   <input type="text" id="sample-field" name="sample-field" value="Test scan"/>
   <input type="button" value="Submit" onclick="submitFormWithScannedImages();">
</form>

<div id="server_response"></div>
1 2 3 4 5 6 7 8 9 10 11 12 13 | function submitFormWithScannedImages() {
if (scanner.submitFormWithImages('form1', imagesScanned, function (xhr) {
if (xhr.readyState == 4) { // 4: request finished and response is ready
document.getElementById('server_response').innerHTML = "<h2>Response from the server: </h2>" + xhr.responseText;
document.getElementById('images').innerHTML = ''; // clear images
imagesScanned = [];
}
})) {
document.getElementById('server_response').innerHTML = "Submitting, please stand by ...";
} else {
document.getElementById('server_response').innerHTML = "Form submission cancelled.";
}
}
|
The <form> target URL https://asprise.com/scan/applet/upload.php?action=dump is
a PHP script that accept form post and echo back all the data received. You may use it to test your form submissions.
All uploaded images to this URL will be automatically deleted after a few days.
The source code of this script is available here. Note that you may
use any programming language (like C# ASP.NET, Java, PHP, Python, Ruby on Rails) to implement the server side.
Let’s take a look at the JavaScript function. scanner.submitFormWithImages, which is defined in scanner.js,
submits scanned images along with all form data to the action url through XMLHttpRequest.
It accepts the following arguments in order:
- formId
The value of the attribute
idof the<form>element. Required.- images
An
ArrayofScannedImage. Its length must be greater than 0 otherwise form submission will be canceled. Required.- onReadyStateChangeHandler
Callback function to be set as XMLHttpRequest.onreadystatechange.
scanner.submitFormWithImages returns the XMLHttpRequest object or undefined if submission is canceled
(form with the given id doesn’t exist or no scanned images are passed).
When form post is done (xhr.readyState == 4), we displays the server response and clear scanned images on the web page (Lines 3-7).
The following is a screenshot of the web page after the scanned image has been uploaded through the form:
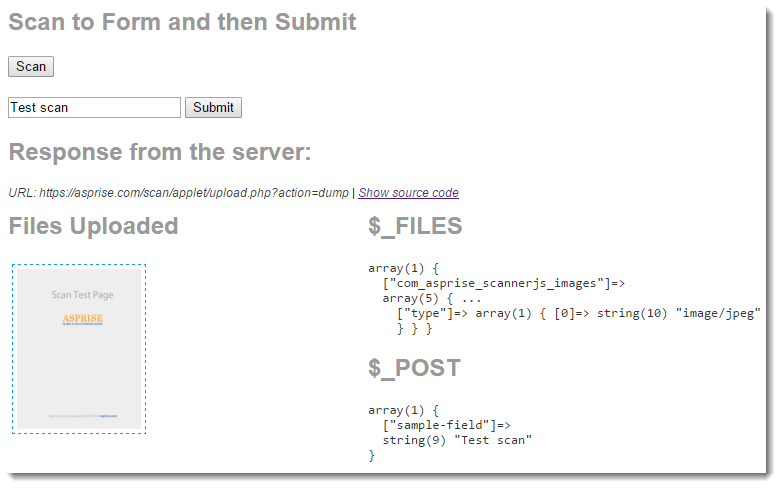
In practice, the upload script usually returns key information through JSON rather than HTML markups. Instead of using https://asprise.com/scan/applet/upload.php?action=dump, you may set the target URL to https://asprise.com/scan/applet/upload.php?action=upload to return path to the upload file only.
Scan to PDF and Upload with a Form
One common use of scanner.js is to scan images as PDF and display thumbnails on the web page. We can modify the code of the above example to implement this feature.
First, we create a JavaScript function scanToPdfWithThumbnails to initiate a scan
with two output settings: one for originals (PDF) and one for thumbnails (JPG):
function scanToPdfWithThumbnails() {
   scanner.scan(displayImagesOnPage,
     {
         "output_settings": [
             {
                 "type": "return-base64",
                 "format": "pdf",
                 "pdf_text_line": "By ${USERNAME} on ${DATETIME}"
             },
             {
                 "type": "return-base64-thumbnail",
                 "format": "jpg",
                 "thumbnail_height": 200
             }
         ]
     }
   );
}
For detailed configuration, please refer to Image Formats Supported.
Now, we need to modify displayImagesOnPage to store originals and display thumbnails on the web page:
1 2 3 4 5 6 7 8 9 10 11 12 13 14 15 16 17 18 19 20 21 22 23 24 25 26 27 28 29 30 31 32 33 34 35 36 37 38 39 40 41 42 43 | function displayImagesOnPage(successful, mesg, response) {
if(!successful) { // On error
console.error('Failed: ' + mesg);
return;
}
if(successful && mesg != null && mesg.toLowerCase().indexOf('user cancel') >= 0) { // User cancelled.
console.info('User cancelled');
return;
}
var scannedImages = scanner.getScannedImages(response, true, false); // returns an array of ScannedImage
for(var i = 0; (scannedImages instanceof Array) && i < scannedImages.length; i++) {
var scannedImage = scannedImages[i];
processOriginal(scannedImage);
}
var thumbnails = getScannedImages(response, false, true); // returns an array of ScannedImage
for(var i = 0; (thumbnails instanceof Array) && i < thumbnails.length; i++) {
var thumbnail = thumbnails[i];
processThumbnail(thumbnail);
}
}
/** Images scanned so far. */
var imagesScanned = [];
/** Processes an original */
function processOriginal(scannedImage) {
imagesScanned.push(scannedImage);
}
/** Processes a thumbnail */
function processThumbnail(scannedImage) {
var elementImg = createDomElementFromModel( {
'name': 'img',
'attributes': {
'class': 'scanned',
'src': scannedImage.src
}
});
document.getElementById('images').appendChild(elementImg);
}
|
The submitFormWithScannedImages function in previous example will remain the same: it will
submit form along with imagesScanned (which stores the originals).
Once the user clicks Submit button, the PDF file will be uploaded as shown below. Click the PDF icon to view it.

Option 2: Scan to PDF and Upload Directly Through Scanner.js
Scanner.js has the capability of uploading images immediately after scanning. Instead of uploading images
through a <form>, you may instruct scanner.js to upload images directly.
1 2 3 4 5 6 7 8 9 10 11 12 13 14 15 16 17 18 19 20 21 22 23 24 25 26 27 28 29 30 31 32 33 34 35 36 37 | function scanAndUploadDirectly() {
scanner.scan(displayServerResponse,
{
"output_settings": [
{
"type": "upload",
"format": "pdf",
"upload_target": {
"url": "https://asprise.com/scan/applet/upload.php?action=dump",
"post_fields": {
"sample-field": "Test scan"
},
"cookies": document.cookie,
"headers": [
"Referer: " + window.location.href,
"User-Agent: " + navigator.userAgent
]
}
}
]
}
);
}
function displayServerResponse(successful, mesg, response) {
if(!successful) { // On error
document.getElementById('server_response').innerHTML = 'Failed: ' + mesg;
return;
}
if(successful && mesg != null && mesg.toLowerCase().indexOf('user cancel') >= 0) { // User cancelled.
document.getElementById('server_response').innerHTML = 'User cancelled';
return;
}
document.getElementById('server_response').innerHTML = getUploadResponse(response);
}
|
Line 7 specifies the image format is pdf. Of course, you can also use other formats like jpg, but here we want
a single file even if there are multiple images.
Line 6 specifies the output setting type is upload. For this type, you must specify upload_target.
The upload target should contains information like url, additional post fields, cookies and headers if any (Lines 8-18).
After the images are scanned and uploaded, displayServerResponse will be invoked. In this case, response
contains the server response instead of the actual image data. Defined in scanner.js, getUploadResponse
extracts server response.
And the corresponding HTML code:
<button type="button" onclick="scanAndUploadDirectly();">Scan and Upload</button>

<div id="server_response"></div>
Other In-Browser Scan Tasks
Scanner.js offers a wide range of functionalities. Below lists common used tasks.
Scan to Local Disk
To scan to local disk, you need to add an output setting with save type and
specify the save_path (either absolute path or path containing macros, refer to save, save-thumbnail):
function scanToLocalDisk() {
   scanner.scan(displayResponseOnPage,
       {
           "output_settings": [
               {
                   "type": "save",
                   "format": "pdf",
                   "save_path": "${TMP}\\${TMS}${EXT}"
               }
           ]
       }
   );
}

function displayResponseOnPage(successful, mesg, response) {
   document.getElementById('response').innerHTML = scanner.getSaveResponse(response);
}
Scan Without Using Asprise Dialog
Asprise Dialog provides an optimized user experience, and using it is highly recommended. However,
if you don’t want to make use it, you can set use_asprise_dialog to false to disable it:
function scanWithoutAspriseDialog() {
   scanner.scan(displayImagesOnPage,
           {
               "use_asprise_dialog": false,
               "output_settings": [
                   {
                       "type": "return-base64",
                       "format": "jpg"
                   }
               ]
           }
   );
}
Scan as PDF with CCITT G4 for Ultra Small File Size
If file size is a concern, you may use PDF with CCITT G4 compression for great saving of disk space. The trade-off is that PDF with CCITT G4 is black/white only. To use it:
scanner.scan(displayServerResponse,
    {
        "output_settings": [
            {
                "type": "upload",
                "format": "pdf",
                "pdf_force_black_white": true, // Enables CCITT G4 compression
                "upload_target": {
                    "url": "https://asprise.com/scan/applet/upload.php?action=dump"
                }
            }
        ]
    }
);
Additional Control Options
| JSON Key | Description | Values |
|---|---|---|
| use_asprise_dialog | Whether Asprise scan dialog should be used; Effective only if it is not specified through argument to the scan function. | true | false |
| show_scanner_ui | Whether scanner UI should be shown; Effective only if it is not specified through argument to the scan function. | false | true |
| dialog_width | The width of the Asprise scanning dialog to be shown | e.g., 1024 |
| dialog_height | The height of the Asprise scanning dialog to be shown | e.g., 800 |
| source_name | The source name of the device to be used or 'select' using the device list dialog or 'default' to use the default device. Default value is 'select'. | select | default | EXACT_SOURCE |
Low Level Scanner Access API
You may use Scanner.js to perform low level scanner operations, for example, listing all scanner sources with full capabilities and setting/getting source capabilities.
Lists all scanners available optionally with capabilities
You use scanner.listSources to list all available scanners:
function listSources() {
   displayText("Listing sources ...");
   scanner.listSources(callbackFunc, false, "all", true, true);
}

function callbackFunc(successful, mesg, result) {
   displayText((successful ? "OK" : "ERROR") + (mesg ? " - " + mesg : "") + "\n" + result);
}
listSources takes the following parameters in order:
- callbackFunc
The function to be called after the operation is done; required.
- nameOnly
boolean - if true, return list of device names separated by ‘,’ otherwise return device info in JSON format. Default: true.
- capsToRetrieve
string - only effective if nameOnly is false - If set, return JSON string; can be cap name or code separated by comma or ‘all’ to list all caps supported.
- detectDeviceType
boolean - detect whether the device has ADF and/or flatbed, default; false
- excludeTwainDsOnWia
boolean - exclude WIA synthesized sources; default: true
Prompts the user to select a source
You use scanner.getSource to prompt the user to select a scanner:
function selectSource() {
   displayText("Select a source ...");
   scanner.getSource(callbackFunc, "select", true);
}
Sets and gets source capabilities
scanner.getSource does more than source selection. You can use it to set and retrieve all the capabilities of a particular source.
function getSourceCaps() {
   displayText("Gets source capabilities ...");
   scanner.getSource(callbackFunc, "select", false, "all", false, true, "CAP_FEEDERENABLED: false; ICAP_UNITS: TWUN_INCHES");
}
getSource takes the following parameters in order:
- callbackFunc
The function to be called after the operation is done; required.
- sourceName
The exact source name or “default” to open default source; “select” to prompt dialog selection; Default: “select”
- nameOnly
If true, return the device name only; default: true
- capsToRetrieve
Only effective if nameOnly is false - can be cap name or code separated by comma or ‘all’ to list all caps supported.
- getCurrent
true to return current value false to return current value as well as value range if available; Default: true
- detectDeviceType
Detect whether the device has ADF and/or flatbed; default: false.
- capsToSet
Optionally, you may set capabilities before getting capabilities, e.g, ‘ICAP_PIXELTYPE: TWPT_GRAY,TWPT_BW; ICAP_XSCALING/RESET; ICAP_XRESOLUTION: 200’
getSource returns the result in JSON or comma separated string depending on the parameter nameOnly.
Get system information
scanner.getSystemInfo allows JavaScript to query system information:
function getSourceCaps() {
   displayText("Gets system info ...");
   scanner.getSystemInfo(callbackFunc);
}
Sample output:
{
   "default_paper_size" : "letter",
   "measurement_system" : "us",
   "os" : "Win10-64",
   "timezone_bias" : 0,
   "timezone_name" : "Eastern Standard Time",
   "timezone_type" : "standard",
   "twain_version" : "2.3.0.0, 2.3.0.0",
   "user_default_lang_code" : "en_US",
   "user_default_lang_id" : 1033,
   "user_default_lc_code" : "en_US",
   "user_default_lc_id" : 1033,
   "user_default_ui_lang_code" : 1033,
   "user_default_ui_lang_id" : 1033,
   "user_geo_nation_id" : 244,
   "user_geo_nation_name" : "US; United States",
   "user_geo_region_id" : -1,
   "user_geo_region_name" : ""
}
Scanner.js Configuration Options
You may use configuration options to control the behavior of Scanner.js. Before including the scanner.js script,
you need to create an object named scannerjs_config:
 <script type="text/javascript">
     window.scannerjs_config = { // must set before including scanner.js
         eager_init: true, // true (default): initialize on start; false: you need to manually call scanner.initialize()

         display_install_func: undefined, // specify a func(Boolean show) to be called to show/hide scan app prompt dialog
         display_scan_ready_func: undefined, // specify a func() to be called upon scanning is enabled
         skip_load_default_css: false, // false (default): loading css styling for the default dialog; true: skip loading

         event_listener: undefined, // specify a func(String eventName, Object details) for listening events like scanner.EVENT_READY

         log_level: 0, // 0 (default): log all;  16: log error only; 1024: log nothing

         scan_app_enabled: true, // true (default): enable scan app; false: disable scan app
         scan_app_download_url: 'http://cdn.asprise.com/scanapp/scan-setup.exe', // scan app download url
         java_applet_enabled: true, // false (default): don't use Java applet even if the browser supports it; true: enable Java applet support

         form_field_name_for_img_objects: 'com_asprise_scannerjs_images[]', // the name of the form field for direct file uploading
         form_field_name_for_img_urls: 'com_asprise_scannerjs_images_urls[]', // the name of the form field for URL only uploading
     };
 </script>
 <script src="//cdn.asprise.com/scannerjs/scanner.js" type="text/javascript"></script>
Delayed Initialization
By default, scanner.js will initialize on page load. You may disable it by setting eager_init to false. In this case,
you need to initialize manually by calling scanner.initialize().
Changing User Interfaces of Notification Dialogs
When the user invokes a scan operation and scan app is not connected, scanner.js will present a dialog prompting the user to download and run the scan app. After scan app is enabled, scanner.js will then dismiss it and displays an ‘OK’ dialog to notify the user.
Styling the dialogs
Below is a HTML code snippet illustrating the structure of the notification dialogs:
<div id="asprise-web-scan-setup-dialog-wrapper" class="asprise-web-scan-dialog-wrapper">
   <div id="asprise-web-scan-setup-dialog-overlay" class="overlay asprise-web-scan-dialog-display"></div>
   <div id="asprise-web-scan-setup-dialog" class="asprise-web-scan-dialog asprise-web-scan-dialog-display"> ... </div>
   <div id="asprise-web-scan-setup-ok-dialog" class="asprise-web-scan-dialog small-dialog asprise-web-scan-setup-ok-dialog"> ... </div>
</div>
You can easily style these dialogs using CSS with selectors of id and/or classes.
If you need to have something completely different from the standard default dialogs, you can:
Implement your own notification UI
To do so, you need to implement and configure two functions.
window.scannerjs_config = {
   // specify a func(Boolean show) to be called to show/hide scan app prompt dialog
   display_install_func: function(show) {
       console.log("Display enabling scan app dialog? " + show);
       if(show) {
           $('#dialog-enable-scan').show(500);
       } else {
           $('#dialog-enable-scan').hide();
       }
       // return true; // 'return true' to continue the default behavior of showing/hiding the standard dialog
   },

   // specify a func() to be called upon scanning is enabled
   display_scan_ready_func: function() {
       console.log("Ready to scan.");
       $('#dialog-ready-to-scan').show().delay(1500).fadeOut();
   }
};
Using Java Applet Instead of the Scan App
If most of your end users are using browsers that supports Java applet, you can configure scanner.js to use Java applet instead of the scan app:
window.scannerjs_config = {
   scan_app_enabled: false, // true (default): enable scan app; false: disable scan app
   java_applet_enabled: true // false (default): don't use Java applet even if the browser supports it; true: enable Java applet support
};
Obtain a License for Production Use
So you have finished developing your scanner enabled web app. It’s time to make it available to the end users. First, order a license from us. Once you receive the license code, you can put it in the configuration object:
window.scannerjs_config = {
   license: 'LICENSE_CODE'
};
The above one line completes the license application. No server activiation or any actions required from you or your end users.
Happy scanning.