C# VB.NET Scanning Library API Dev Guide
Asprise Scanning and Imaging for C# VB.NET Installation
There are two options: install using NuGet or manually download the SDK from asprise.com.
Option 1: NuGet PM> Install-Package asprise-scan-api
First, create a new Visual C#/Visual Basic Windows Form Application project into a solution if you don’t have an existing project.
With this solution opened, open NuGet Package Manager Console, and type the following command:
Install-Package asprise-scan-scanner-twain-wia-apiOnce it is done, you can invoke the Scan demo Form by copying the following code to Program.cs (for C#):
1 2 3 4 5 6 7 8 9 | ...
static class Program { // Program.cs
[STAThread]
static void Main() {
Application.EnableVisualStyles();
Application.SetCompatibleTextRenderingDefault(false);
Application.Run(new asprise_imaging_api.SampleScanForm());
}
}
|
If you are using Visual Basic .NET, create a new module with a Main Sub and put the VB.NET equivalent of the above code to it.
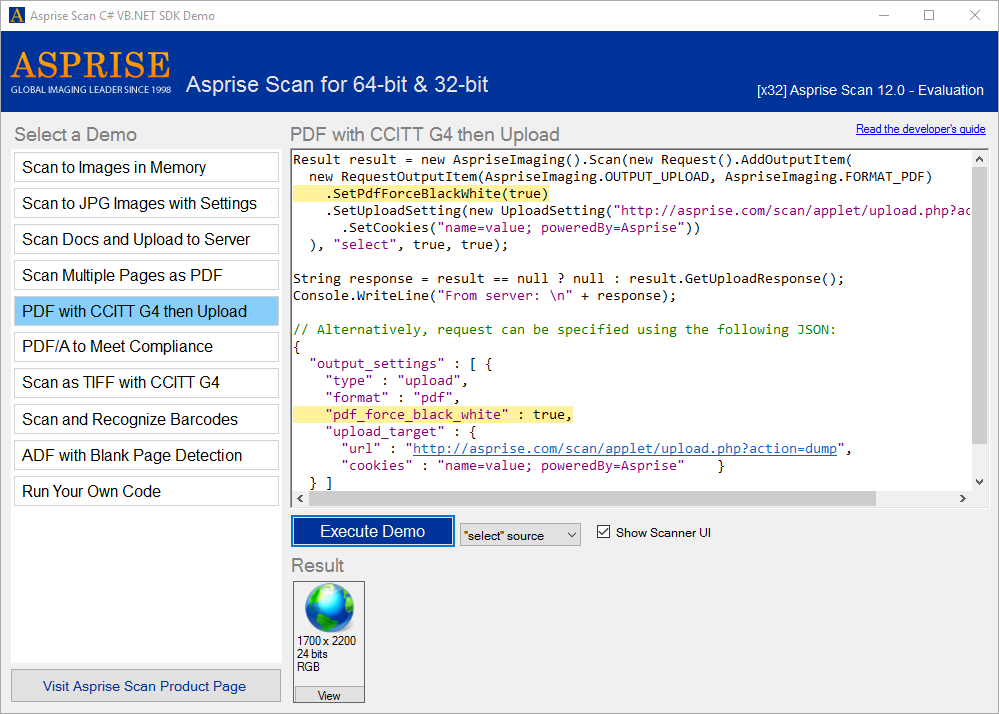
Click ‘Start’ or press F5 and you should see the demo UI as shown below. Select a demo on the left panel and hit the ‘Execute Demo’ button to execute a demo. You may also execute your own scan DSL (domain-specific language) code in “Run Your Own Code” - please refer to Asprise Scanning Request DSL for details.

Later sections will introduce how to invoke the scan API without the UI.
Option 2: Download Asprise Scan SDK from asprise.com
Download a copy of Asprise Scan SDK here. Simply unzip it.
The file organization of Asprise Scan SDK distribution is as follows:
SCAN SDK|--- asprise_imaging.dll, asprise_imaging_x64.dll [required DLL]+--- asprise-scan-scanner-twain-wia-api [.NET Scan API project]+--- scan-demos [Demo application]Open the solution: asprise-imaging-scan.sln using Visual Studion 2013 or higher, and there are two projects:
asprise-scan-scanner-twain-wia-api: Asprise Scan .NET API
scan-demos: sample demo application
To run the demos:
Right click on
scan-demosproject and “Set as StartUp Project”;Hit ‘Start’ button or press F5 and you’ll see the demo UI as shown in last section.
Jump Start
Asprise C# VB.NET Scanning SDK provides an powerful API for you to control the scanning process.
Suppose that we need to scan color US letter documents and save the result in JPEG files. The following code demonstrates how to use Asprise .NET Scanning API to achieve that:
1 2 3 4 5 6 7 8 9 10 11 12 | using asprise_imaging_api;
Result result = new AspriseImaging().Scan(new Request()
.SetTwainCap(TwainConstants.ICAP_PIXELTYPE, TwainConstants.TWPT_RGB)
.SetTwainCap(TwainConstants.ICAP_SUPPORTEDSIZES, TwainConstants.TWSS_USLETTER)
.SetPromptScanMore(true) // prompt to scan more pages
.AddOutputItem(new RequestOutputItem(AspriseImaging.OUTPUT_SAVE, AspriseImaging.FORMAT_JPG)
.SetSavePath(".\\${TMS}${EXT}")), // Environment variables in path will be expanded
"select", true, true); // "select" prompts device selection dialog.
List<string> files = result == null ? null : result.GetImageFiles();
Console.WriteLine("Scanned: " + string.Join(", ", files == null ? new string[0] : files.ToArray()));
|
The same code in Visual Basic .NET:
1 2 3 4 5 6 7 8 9 10 11 12 | Imports asprise_imaging_api
Dim result As Result = New AspriseImaging().Scan(New Request()
.SetTwainCap(TwainConstants.ICAP_PIXELTYPE, TwainConstants.TWPT_RGB)
.SetTwainCap(TwainConstants.ICAP_SUPPORTEDSIZES, TwainConstants.TWSS_USLETTER)
.SetPromptScanMore(True) ' prompt to scan more pages
.AddOutputItem(New RequestOutputItem(AspriseImaging.OUTPUT_SAVE, AspriseImaging.FORMAT_JPG)
.SetSavePath(".\${TMS}${EXT}")), ' Environment variables in path will be expanded
"select", True, True) ' "select" prompts device selection dialog.
Dim files As List(Of String) = If(result Is Nothing, Nothing, result.GetImageFiles())
Console.WriteLine("Scanned: " & String.Join(", ", If(files Is Nothing, New String(-1) {}, files.ToArray())))
|
Line 3: Invokes the scan function with a new scan request.
Line 4-5: Configures TWAIN scanning settings: color is RBG and paper size is US letter.
Line 7-8: Specifies the target output: save scanned images as JPEG files on local hard disk.
Line 11-12: Obtains the image files saved and prints out.
Note that above is a basic sample use of the API. Asprise Scanning API provides far more functions. For example, instead of saving the images as JPEG files, you may request to return the images as PNG in memory or upload as a multi-page PDF file or combination of them.
In addition to above object-oriented invocation of the scanning API, alternatively, you may specify scanning requests in JSON for brevity and readability.
Specify Request Using Scan DSL
Asprise C# VB.NET Scanning SDK also allows you to specify scan requests using JSON based scan DSL (please refer to Asprise Scanning Request DSL for details). The code below is equivalent to the OO based code:
1 2 3 4 5 6 7 8 9 10 11 12 13 14 15 | Result result = new AspriseImaging().Scan("{" +
" \"twain_cap_setting\" : {" +
" \"ICAP_PIXEXELTYPE\" : \"TWPT_RGB\"," +
" \"ICAP_SUPPORPORTEDSIZES\" : \"TWSS_USLESLETTER\"" +
" }," +
" \"prompt_scan_more\" : true," +
" \"output_settings\" : [ {" +
" \"type\" : \"save\"," +
" \"format\" : \"jpg\"," +
" \"save_path\" : \".\\\\${TMS}${EXT}\"" +
" } ]" +
"}", "select", true, true);
List<string> files = result == null ? null : result.GetImageFiles();
Console.WriteLine("Scanned: " + string.Join(", ", files == null ? new string[0] : files.ToArray()));
|
As JSON string can be easily stored and retrieved, it may simplify your job when you build functions like profile based scanning.
More Scanning Use Case Scenarios
Scan Documents into Images in Memory
If you simply need to display the scanned images in your application, you may consider to scan images into memory. Scanned images will be returned as a list of System.Drawing.Image. you can then display images on UI (for example, using PictureBox).
1 2 3 4 5 6 7 8 9 10 11 12 13 14 15 | //using asprise_imaging_api;
Result result = new AspriseImaging().Scan(new Request()
new RequestOutputItem(AspriseImaging.OUTPUT_RETURN_BASE64, AspriseImaging.FORMAT_JPG) // Output type and image format
), "select", true, true); // "select" a scanner or use "default" scanner without selection
List<Image> images = result == null ? null : result.GetImages(); // null when user cancels
// you may then display the images using PictureBox ...
// --- Alternatively, request can be specified using JSON ---
Result result = new AspriseImaging().Scan("{" +
" \"output_settings\" : [ {" +
" \"type\" : \"return-base64\"," +
" \"format\" : \"jpg\"" +
" } ]" +
"}", "select", true, true);
|
Scan and Upload to Server
With Asprise Scanning SDK, it’s easy to allow the user to scan and upload to the server. The server side script to handle the upload can be written in any programming language, ASP.NET, Java, PHP, Python, Ruby, etc. You handle the upload from Asprise Scanning SDK in the same way as you handle a simple HTML form upload.
1 2 3 4 5 6 7 8 9 10 11 12 13 14 15 16 17 18 19 20 21 22 | Result result = new AspriseImaging().Scan(new Request().AddOutputItem(
new RequestOutputItem(AspriseImaging.OUTPUT_UPLOAD, AspriseImaging.FORMAT_JPG).SetUploadSetting( // Upload
new UploadSetting("http://asprise.com/scan/applet/upload.php?action=dump")
.AddPostField("title", "Test scan"))) // Additional data to be passed to server: post fields, headers, etc.
"select", true, true);
String response = result == null ? null : result.GetUploadResponse();
Console.WriteLine("From server: \n" + response);
// Alternatively, request can be specified using JSON
Result result = new AspriseImaging().Scan("{" +
" \"output_settings\" : [ {" +
" \"type\" : \"upload\"," +
" \"format\" : \"jpg\"," +
" \"upload_target\" : {" +
" \"url\" : \"http://asprise.com/scan/applet/upload.php?action=dump\"," +
" \"post_fields\" : {" +
" \"title\" : \"Test scan\"" +
" }" +
" }" +
" } ]" +
"}", "select", true, true);
|
When you upload the scan images, you may send along other data, such as post fields, cookies, etc. Authorization can also be configured. Please refer to Asprise Scanning Request DSL for complete options.
Scan Multiple Pages as PDF
Scanning multiple pages as a single PDF file simplifies organization. To do so, you need to set the
format type to AspriseImaging.FORMAT_PDF. Additionally, you may add a text line to the bottom
of the first page and set EXIF tags.
1 2 3 4 5 6 7 8 9 10 11 12 13 14 15 16 17 18 19 20 21 22 23 24 | Result result = new AspriseImaging().Scan(new Request().AddOutputItem(
new RequestOutputItem(AspriseImaging.OUTPUT_SAVE, AspriseImaging.FORMAT_PDF)
.SetPdfTextLine("Scanned on ${DATETIME} by user X") // Optional text line at the bottom of the 1st page
.AddExifTag("DocumentName", "Scan to PDF by Asprise") // Optional PDF doc properties (metadata)
.SetSavePath(".\\${TMS}${EXT}")
).SetPromptScanMore(true) // whether to prompt user to scan more pages
, "select", true, true);
string pdfFile = result == null ? null : result.GetPdfFile();
Console.WriteLine("Documents scanned as PDF: " + pdfFile);
// Alternatively, request can be specified using the following JSON:
{
"output_settings" : [ {
"type" : "save",
"format" : "pdf",
"pdf_text_line" : "Scanned on ${DATETIME} by user X",
"pdf_owner_password" : "",
"pdf_user_password" : "",
"exif" : {
"DocumentName" : "Scan to PDF by Asprise" },
"save_path" : ".\\${TMS}${EXT}" } ],
"prompt_scan_more" : true
}
|
When outputting PDF, Asprise Scanning SDK provides you powerful options listed below.
Ultra Small Sized Black/White PDF
PDF with CCITT G4 compression results extreme small file size. However, the tradeoff is that images will be in black/white.
new RequestOutputItem(AspriseImaging.OUTPUT_UPLOAD, AspriseImaging.FORMAT_PDF)
   .SetPdfForceBlackWhite(true)

// ... Alternatively, request can be specified using the following JSON:
{
  "output_settings" : [ {
    "type" : "save",
    "format" : "pdf",
    "pdf_force_black_white" : true,
    "save_path" : ".\\${TMS}${EXT}"  } ],
  "prompt_scan_more" : true
}
PDF/A to Meet Compliance Requirements
If PDF/A is required, you can configure to output PDF/A instead of normal PDF. When using PDF/A, you can’t set owner password or user password to protect the PDF file.
new RequestOutputItem(AspriseImaging.OUTPUT_UPLOAD, AspriseImaging.FORMAT_PDF)
   .SetPdfForceBlackWhite(true)

// ... Alternatively, request can be specified using the following JSON:
{
  "output_settings" : [ {
    "type" : "save",
    "format" : "pdf",
    "pdf_force_black_white" : true,
    "save_path" : ".\\${TMS}${EXT}"  } ],
  "prompt_scan_more" : true
}
Scan as TIFF with CCITT G4
Similar to PDF, TIFF also supports multiple pages in a single file. You set the
format type to AspriseImaging.FORMAT_TIF to output TIFF files. Optionally, you can use CCITT G4 compression to reduce the file size.
1 2 3 4 5 6 7 8 9 10 11 12 13 14 15 16 17 | Result result = new AspriseImaging().Scan(new Request().AddOutputItem(
new RequestOutputItem(AspriseImaging.OUTPUT_SAVE, AspriseImaging.FORMAT_TIF)
.SetTiffCompression(AspriseImaging.TIFF_COMPRESSION_CCITT_G4)// CCITT T.6 Compression
.SetSavePath(".\\${TMS}${EXT}")
), "select", true, true);
string tiffFile = result == null ? null : result.GetTiffFile();
Console.WriteLine("Documents scanned as TIFF: " + tiffFile);
// Alternatively, request can be specified using the following JSON:
{
"output_settings" : [ {
"type" : "save",
"format" : "tif",
"tiff_compression": "G4",
"save_path" : ".\\${TMS}${EXT}" } ]
}
|
Scan and Recognize Barcodes
Even if your scanner doesn’t support barcode recognition, Asprise Scanning SDK
supports quick barcode recognition. You set recognize_barcodes to true to enable it.
1 2 3 4 5 6 7 8 9 10 11 12 13 14 15 16 | Result result = new AspriseImaging().Scan(new Request()
.SetRecognizeBarcodes(true)
.AddOutputItem(new RequestOutputItem(AspriseImaging.OUTPUT_SAVE, AspriseImaging.FORMAT_JPG).SetSavePath(".\\${TMS}${EXT}")),
"select", true, true);
List<string> barcodes = result == null ? null : result.GetBarcodes();
Console.WriteLine("Barcodes: " + string.Join(";\n", barcodes == null ? new string[0] : barcodes.ToArray()));
// Alternatively, request can be specified using the following JSON:
{
"recognize_barcodes" : true,
"output_settings" : [ {
"type" : "save",
"format" : "jpg",
"save_path" : ".\\${TMS}${EXT}" } ]
}
|
ADF with Optional Blank Page Detection
Asprise Scanning SDK fully supports Automatic Document Feeder (ADF). Optionally, you may choose to automatically discard blank page.
1 2 3 4 5 6 7 8 9 10 11 12 13 14 15 16 17 18 19 20 21 22 23 24 25 26 27 | Result result = new AspriseImaging().Scan(new Request()
.SetTwainCap(TwainConstants.CAP_FEEDERENABLED, true) // select feeder instead of flatbed
.SetTwainCap(TwainConstants.CAP_AUTOFEED, true)
.SetTwainCap(TwainConstants.CAP_DUPLEXENABLED, true)
.SetDiscardBlankPages(true)
.SetBlankPageThreshold(0.02m) // Discard pages with ink coverage < 2%
.AddOutputItem(new RequestOutputItem(AspriseImaging.OUTPUT_SAVE, AspriseImaging.FORMAT_PDF).SetSavePath(".\\${TMS}${EXT}")),
"select", true, true);
string pdfFile = result == null ? null : result.GetPdfFile();
Console.WriteLine("Documents scanned as PDF: " + pdfFile);
// Alternatively, request can be specified using the following JSON:
{
"twain_cap_setting" : {
"CAP_FEEDERENABLED" : true,
"CAP_AUTOFEED" : true,
"CAP_DUPLEXENABLED" : true
},
"discard_blank_pages" : true,
// pages with ink coverage below the threshold will be discarded
"blank_page_threshold" : "0.02", // default value is 0.02
"output_settings" : [ {
"type" : "save",
"format" : "pdf",
"save_path" : ".\\${TMS}${EXT}" } ]
}
|
Common Operations and Tasks
The following sections list common scanning related operations and tasks.
List Sources Optionally with Capabilities
To list all scanners and cameras optionally with their capabilities:
1 2 3 4 5 6 7 8 9 10 11 12 | AspriseImaging imaging = new AspriseImaging();
List<Source> sourcesNameOnly = imaging.ScanListSources(); // Names without capabilities
List<Source> sourcesFullDetails = imaging.ScanListSourcesWithFullDetails(); // with caps
foreach (Source source in sourcesFullDetails)
{
Console.WriteLine(source.ProductName + ": pixel type = " +
source.GetCap(TwainConstants.ICAP_PIXELTYPE).GetCurrentValue());
}
Source defaultSource = Source.GetDefaultSource(sourcesFullDetails);
Console.WriteLine("Default source is: " + defaultSource);
|
The default source has its Source.defaultSource set to true.
Feeder (ADF) and Flatbed Detection
When listing sources using AspriseImaging.ScanListSources(true, "all", true, true), both feeder and flatbed units are detected.
To check whether a scanner has a feeder and/or a flatbed, you may use:
source.HasFeeder();
source.HasFlatbed();
Accessing Capabilities
To access the capabilities on the Source object:
List<Capability> caps = source.GetCaps();
foreach (Capability cap in caps)
{
    Console.WriteLine(cap.GetName() + ": " + cap.GetCurrentValue());
}

// Get a particular capability
Capability capPixelType = source.GetCap(TwainConstants.ICAP_PIXELTYPE);
Set and Get Capabilities
AspriseImaging.GetSource can be used to set and get capabilites.
For example, to select the feeder and list all its capabilities:
Source source = new AspriseImaging().GetSource("select", false, "all", false, false,
   "CAP_FEEDERENABLED: 1; CAP_DUPLEXENABLED: 1");
List<Capability> caps = source.GetCaps();
Note that in above code, “select” prompts the user to select a source. You may use the exact source name to select the device directly without prompting the device selection dialog.
You may specify an explicit list of capabilities instead of ‘all’:
Source source = new AspriseImaging().GetSource("select", false, "ICAP_PIXELTYPE, ICAP_UNITS", false, false,
   "CAP_FEEDERENABLED: 1; CAP_DUPLEXENABLED: 1");
List<Capability> caps = source.GetCaps();
Troubleshooting
By default, Asprise Scanning logs to stdout at INFO level. When troubleshooting, you may choose to log to a file at DEBUG level as shown below:
Console.WriteLine("Scan lib version: " + AspriseImaging.GetLibraryVersion() + " built on " + AspriseImaging.GetLibraryBuildInfo());

AspriseImaging.configureNativeLogging(AspriseImaging.LOG_LEVEL_DEBUG, "C:\\scanner-log.txt");
Multi-Threading with Asprise Scan
The rule of the thumb is that you should perform scan related calls from the same thread.
Software Packaging and Distribution
So you have successfully developed your .NET applications with Asprise Scanning and Imaging SDK. It’s time to distribute your programs to end users. First, make sure you are an authorized licensee registered with Asprise. To purchase a license, please visit: http://asprise.com


