


Java OCR Library API Dev Guide
Asprise OCR for Java Installation
There are two options: add Asprise OCR as a maven/gradle dependency or manually download the SDK from asprise.com.
Option 1: Add Asprise OCR as a Maven/Gradle Dependency
If you are using maven for your build, simply add the following dependency to your pom.xml (under element: /project/dependencies):
<dependency>
    <groupId>com.asprise.ocr</groupId>
    <artifactId>java-ocr-api</artifactId>
    <version>[15,)</version>
</dependency>
For gradle users, you need to add the following line to your build.gradle (under dependencies):
compile group: 'com.asprise.ocr', name: 'java-ocr-api', version: '[15,)'
For Scala SBT:
libraryDependencies += "com.asprise.ocr" % "java-ocr-api" % "[15,)"
After adding Asprise OCR as an dependency, you can then launch and play with the demo program:
import com.asprise.ocr.Ocr;

public class App {
  public static void main( String[] args ) {
    Ocr.main(args);
  }
}
Once the demo UI launches, you can perform OCR easily by selecting an image file and hitting the OCR button:
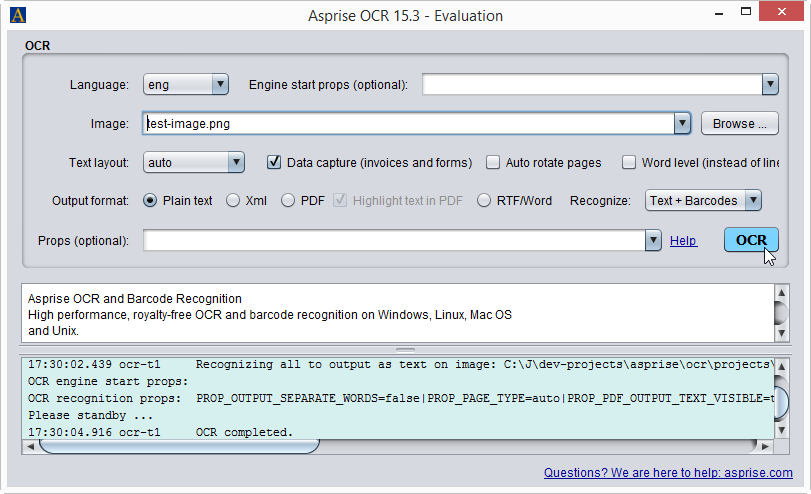
Later sections will introduce how to invoke the OCR API without the UI.
Option 2: Download Asprise OCR SDK from asprise.com
Download a copy of Asprise OCR SDK from http://www.asprise.com/product/ocr. Simply unzip it to an empty folder. Let’s refer this folder as OCR_HOME.
The file organization of Asprise OCR SDK distribution is as follows:
OCR_HOME|--- aocr.jar [Java library; the only file you need]|--- javadoc [Java docs]+--- images [folder, containing sample image documents]|--- *.bat|sh [Launch OCR demos]After unzipping the archive, run the batch script to launch the OCR demo program.
Development Environment Setup
After you have obtained and unzipped the Asprise OCR SDK kit, you need to setup your development environment in order to develop Java applications with Asprise OCR. To do so, you only need to:
Put aocr.jar into your class path
Jump Start
The following code demonstrates the basic usage of Asprise OCR:
1 2 3 4 5 6 7 8 9 10 | import com.asprise.ocr.Ocr
...
Ocr.setUp(); // one time setup
Ocr ocr = new Ocr(); // create a new OCR engine
ocr.startEngine("eng", Ocr.SPEED_FASTEST); // English
String s = ocr.recognize(new File[] {new File("test-image.png")}, Ocr.RECOGNIZE_TYPE_ALL, Ocr.OUTPUT_FORMAT_PLAINTEXT);
System.out.println("Result: " + s);
// ocr more images here ...
ocr.stopEngine();
|
Line 1: Imports the Ocr class.
Line 5: Creates a new Ocr engine that recognizes English in fastest speed setting; The evaluation version is able to recognize English (eng), Spanish (spa), Portuguese (por), German (deu) and French (fra). For other languages, please contact us. The list of languages supported can be found Languages Supported.
Line 7: All the OCR work is done here. The recognizeAll method of the com.asprise.util.ocr.OCR class recognizes all the characters and barcodes
from the image and output them as a string. The output format is set as plain text. Other supported formats are: XML (Ocr.OUTPUT_FORMAT_XML),
searchable PDF (Ocr.OUTPUT_FORMAT_PDF) and user editable RTF (Ocr.OUTPUT_FORMAT_RTF).
Input and Output
Asprise OCR supports the following image formats: GIF, PNG, JPEG, TIFF and PDF.
For the sample OCR code in above section, if the input looks like below:

[Download the actual input image here]
The OCR output will be:
Plain-text Format
Asprise OCR and Barcode Recognition

High performance, royalty-free OCR and barcode recognition on Windows,
...
ISBN-l3, Interleaved 2 of 5, Code 39, Code 128, PDF417, and QR Code.

[[QR-Code: www.asprise.com]]
[[CODE-128: Asprise]].
The last two lines represents bar code information extract. Note both the format and content of the barcode are enclosed in ‘[[ ]]’ pairs.
XML Format
Asprise OCR XML output contains rich information like text coordinates, fonts, confidence level, barcode type, barcode locations, as well as table information (cells with location and row/column info).
Set the output format to OUTPUT_FORMAT_XML, and the you’ll get:
1 2 3 4 5 6 7 8 9 10 11 12 13 14 15 16 17 18 19 20 21 22 | <?xml version="1.0"?>
<?xml-stylesheet type="text/xsl" href="aocr.xsl"?>
<asprise-ocr input="test-image.png">
<page no="0" width="2400" height="3200" words="126" confidence="92" time-taken="1.928">
<block id="1e" type="text" subtype="line" x="320" y="248" width="1176" height="63" words="5" confidence="93" font-name="Times_New_Roman" font-size="66" font-bold="0" font-italic="0" font-serif="1" baseline="297" xheight="34" ascent="15" descent="-15">Asprise OCR and Barcode Recognition</block>
<block id="1f" type="text" subtype="line" x="320" y="360" width="1725" height="43" words="13" confidence="92" font-name="Times_New_Roman" font-size="45" font-bold="0" font-italic="0" font-serif="1" baseline="394" xheight="23" ascent="11" descent="-10">High performance, royalty-free OCR and barcode recognition on Windows, Linux, Mac OS</block>
<!-- ... -->
<table id="4" x="320" y="1083" width="1766" height="169" rows="3" cols="2" cells="6" words="10" confidence="91">
<cell id="3" x="320" y="1083" width="563" height="57" row="0" col="0" rowspan="1" colspan="1">
<block id="29" type="text" subtype="line" x="343" y="1098" width="429" height="41" words="3" confidence="92" font-name="Times_New_Roman" font-size="41" font-bold="0" font-italic="0" font-serif="1" baseline="1130" xheight="23" ascent="9" descent="-8">PDF Output Formats</block>
</cell>
<cell id="5" x="883" y="1083" width="1203" height="57" row="0" col="1" rowspan="1" colspan="1">
<block id="2a" type="text" subtype="line" x="905" y="1099" width="181" height="32" words="1" confidence="90" font-name="Times_New_Roman" font-size="37" font-bold="0" font-italic="0" font-serif="1" baseline="1130" xheight="22" ascent="9" descent="-5">Remarks</block>
</cell>
<cell id="6" x="320" y="1140" width="563" height="55" row="1" col="0" rowspan="1" colspan="1">
<block id="2b" type="text" subtype="line" x="343" y="1154" width="83" height="31" words="1" confidence="93" font-name="Times_New_Roman" font-size="43" font-bold="0" font-italic="0" font-serif="1" baseline="1185" xheight="21" ascent="10" descent="-10">PDF</block>
</cell>
<!-- ... -->
<block id="1" type="barcode" subtype="QR-Code" x="1397" y="1647" width="441" height="441" confidence="1">www.asprise.com</block>
<block id="2" type="barcode" subtype="CODE-128" x="348" y="1651" width="583" height="147" confidence="148">Asprise</block>
</page>
</asprise-ocr>
|
You may view the result in a browser. To do so, you need to save the XML into a file (e.g. ocr-result.xml) and download http://asprise.com/ocr/files/schema/15/aocr.xsl to the same folder as the XML file. Then open the XML file using IE, Firefox or Safari (Chrome doesn’t support this):

Searchable PDF Format
If you set the output format as OUTPUT_FORMAT_PDF, you need to specify the target PDF output file as following:
1 2 3 | ocr.recognize(new File[] {new File("test-image.png")},
Ocr.RECOGNIZE_TYPE_ALL, Ocr.OUTPUT_FORMAT_PDF,
"PROP_PDF_OUTPUT_FILE=ocr-result.pdf|PROP_PDF_OUTPUT_TEXT_VISIBLE=true");
|
In above code, properties are specified in a single string separated by | (with key and value separated by =). Alternatively, you may specify properties separately in pairs:
1 2 3 4 | ocr.recognize(new File[] {new File("test-image.png")},
Ocr.RECOGNIZE_TYPE_ALL, Ocr.OUTPUT_FORMAT_PDF,
Ocr.PROP_PDF_OUTPUT_FILE, "ocr-result.pdf",
Ocr.PROP_PDF_OUTPUT_TEXT_VISIBLE, true);
|
A third way to specify properties is to use the PropertyBuilder:
1 2 3 4 5 6 | ocr.recognize(new File[] {new File("test-image.png")},
Ocr.RECOGNIZE_TYPE_ALL, Ocr.OUTPUT_FORMAT_PDF,
new Ocr.PropertyBuilder()
.setPdfOutputFile("ocr-result.pdf")
.setPdfTextVisible(true)
);
|
For the list of all supported properties, please refer to Asprise OCR Property Summary.
Once the OCR done, you can open the PDF output file with any PDF viewer and perform searches:
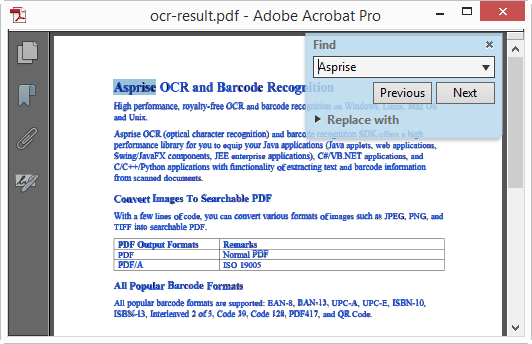
To make the text invisible or transparent, you simply set PROP_PDF_OUTPUT_TEXT_VISIBLE to false.
Both normal PDF and PDF/A are supported. Please refer to the options guide.
Rich Text Format (RTF)
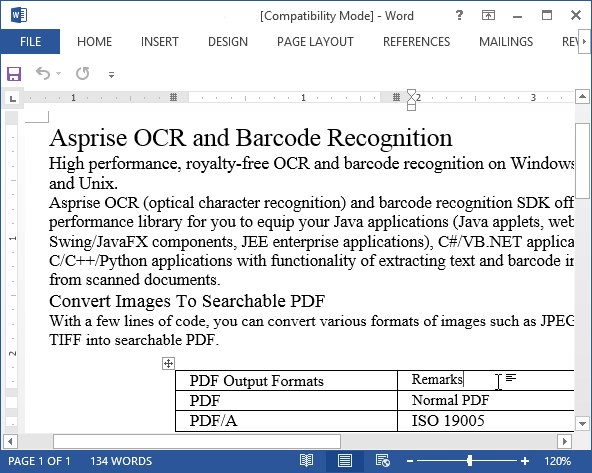
Set the output format as OUTPUT_FORMAT_RTF, you can then output .rtf files that can be edited in most word processors (Microsoft Word, Libre Office, TextEdit, etc.).
1 2 3 | ocr.recognize(new File[] {new File("test-image.png")},
Ocr.RECOGNIZE_TYPE_ALL, Ocr.OUTPUT_FORMAT_RTF,
"PROP_RTF_OUTPUT_FILE=ocr-result.rtf");
|
Once the OCR done, you can open the RTF file with a word processor:
OCR In Action
This section covers common OCR tasks.
Recognizes text only or barcode only
To save OCR time, you can choose to OCR text or barcode only:
Text only:
String s = ocr.recognize(new File[] {new File("test.png")},
   Ocr.RECOGNIZE_TYPE_TEXT, Ocr.OUTPUT_FORMAT_PLAINTEXT);
Barcode only:
String s = ocr.recognize(new File[] {new File("test.png")},
   Ocr.RECOGNIZE_TYPE_BARCODE, Ocr.OUTPUT_FORMAT_PLAINTEXT);
Perform OCR on part of the image
In some cases, you might not want to OCR the whole image. In that case, you can OCR on part of the image to save time:
String s = ocr.recognize("test.png", -1, 0, 0, 400, 200,
   Ocr.RECOGNIZE_TYPE_TEXT, Ocr.OUTPUT_FORMAT_PLAINTEXT);
The above code OCR the top left part of the image with width 400 pixels and height 200 pixels.
Perform OCR on multiple input files in one shot
You can perform OCR on multiple files in one shot:
String s = ocr.recognize("test.png;test2.jpg", -1, 0, 0, 400, 200,
   Ocr.RECOGNIZE_TYPE_TEXT, Ocr.OUTPUT_FORMAT_PLAINTEXT);
Perform OCR on a certain page from the specified TIFF file
A TIFF file may contain multiple pages. If you need to recognize only a certain page, you can specify the page number as following:
String s = ocr.recognize("test.tif", 1, -1, -1, -1, -1,
   Ocr.RECOGNIZE_TYPE_TEXT, Ocr.OUTPUT_FORMAT_PLAINTEXT);
Note 1 means the second page (the page number of the first page is 0). -1 means all pages.
Perform OCR on a PDF input file
You use the following method to perform OCR on a PDF input file:
String s = ocr.recognize("test.pdf", -1, 100, 100, 400, 200,
   Ocr.RECOGNIZE_TYPE_TEXT, Ocr.OUTPUT_FORMAT_PLAINTEXT);
Improve OCR Accuracy
Scan in Grayscale with DPI 300
If the input images are from scanners, please follow the guidelines below:
Scan at resolution DPI 300 (or 400 for small fonts). Higher DPI may not necessarily result in better accuracy but lower DPI may affect the quality.
Scan in grayscale mode or color mode, but not black/white mode.
Pre-Process Images
Image pre-processing can be a great tool to improve OCR accuracy for special images.
Images with very small font
Enlarge it:
PROP_IMG_PREPROCESS_TYPE=custom|PROP_IMG_PREPROCESS_CUSTOM_CMDS=scale(2);default()
Images with light text on a dark background
Invert it:
PROP_IMG_PREPROCESS_TYPE=custom|PROP_IMG_PREPROCESS_CUSTOM_CMDS=invert();default()
Image operations specified PROP_IMG_PREPROCESS_CUSTOM_CMDS are executed in a
chain. You can chain
many opertions in the command. The list of available operations can be found at Image Pre-processing Related Properties.
Provide Dictionaries or Templates
The OCR engine is optimized to recognize human readable words and there are built-in dictionaries and templates. We’ll use an example to find out roles played by dictionaries.
For example, the image below contains two words: abcdopqr abcd0pqr:
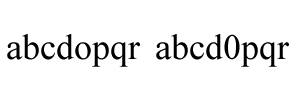
The OCR result with the default settings will be: abcdopqr abchpqr. The OCR engine may have detected abcd0pqr but it discarded it
as it is unlikely a word since there is a number between characters.
Suppose we do consider abcd0pqr as a word. In such case, we can provide our own dictionary file:
abcdopqr
abcd0pqr
Note word entries are separated by line breaks. Save the above content into a file dict.txt and specify it when you start the OCR engine:
Ocr ocr = new Ocr(); // create a new OCR engine
ocr.startEngine("eng", Ocr.SPEED_FASTEST, "START_PROP_DICT_CUSTOM_DICT_FILE=dict.txt");
String s = ocr.recognize(new File[] {new File("image.png")}, Ocr.RECOGNIZE_TYPE_ALL, Ocr.OUTPUT_FORMAT_PLAINTEXT);
Note this property must be specified when you call startEngine. Now, you’ll get the extact text as on the image: abcdopqr abcd0pqr
Alternatively, you can specify the words using a template:
abcd\\npqr
Template entries are separated by line breaks. Save it to a file templates.txt and specify it using :
Ocr ocr = new Ocr(); // create a new OCR engine
ocr.startEngine("eng", Ocr.SPEED_FASTEST, "START_PROP_DICT_CUSTOM_TEMPLATES_FILE=templates.txt");
String s = ocr.recognize(new File[] {new File("image.png")}, Ocr.RECOGNIZE_TYPE_ALL, Ocr.OUTPUT_FORMAT_PLAINTEXT);
Again, the correct result is returned.
The following wildcards are allowed in templates:
|
Any alphbet character |
|
Digit (0-9) |
|
Alphabet or digit |
Multi-threading with Asprise OCR
Most of modern computers run on multi-core CPUs. Multi-threading can significantly reduce the runtime by making full use of the processor power. It is easy to do multi-threading with Asprise OCR.
You can implement thread pool pattern by yourself with the com.asprise.ocr.Ocr class. Note that each thread must have its own dedicated OCR engine instance.
However, you do not need to start from scratch as Asprise OCR offer com.asprise.ocr.OcrExecutorService class
that wraps OCR functionality in an executor service. OcrExecutorService frees you from writing tricky thread management code.
Code sample:
OcrExecutorService oes =
  new OcrExecutorService("eng", Ocr.SPEED_FASTEST, 4); // 4 threads

List<Future<String>> futures = oes.invokeAll(Arrays.asList(
  new OcrExecutorService.OcrCallable(
    new File[] {new File("test1.png")},
      Ocr.RECOGNIZE_TYPE_ALL, Ocr.OUTPUT_FORMAT_XML),
  new OcrExecutorService.OcrCallable(
    new File[] {new File("test2.png")},
      Ocr.RECOGNIZE_TYPE_ALL, Ocr.OUTPUT_FORMAT_XML)
);

System.out.println("Result of test1.png: " + futures.get(0).get());
System.out.println("Result of test2.png: " + futures.get(1).get());

oes.shutdown(); // stops all OCR engines and disposes all threads
Software Packaging and Distribution
So you have successfully developed your Java applications with Asprise OCR. It’s time to distribute your programs to end users. First, make sure you are an authorized licensee registered with Asprise. To purchase a license, please visit: http://www.asprise.com/product/ocr